Webhook Connection for Jira Server
You can send JSON payloads from Sumo Logic alerts as an HTTP POST request to create Jira issues in Jira Server. Learn more about the Jira REST API in their Jira Cloud platform Developer Reference.
Webhook connections rely on HTTP endpoints that tell Sumo Logic where to send data. You can set up any number of connections.
Prerequisite
To send webhook alerts to Jira Server you need to include a Basic Authentication Header with requests.
Get the username and password of a user that has permissions to create issues in your Jira Server.
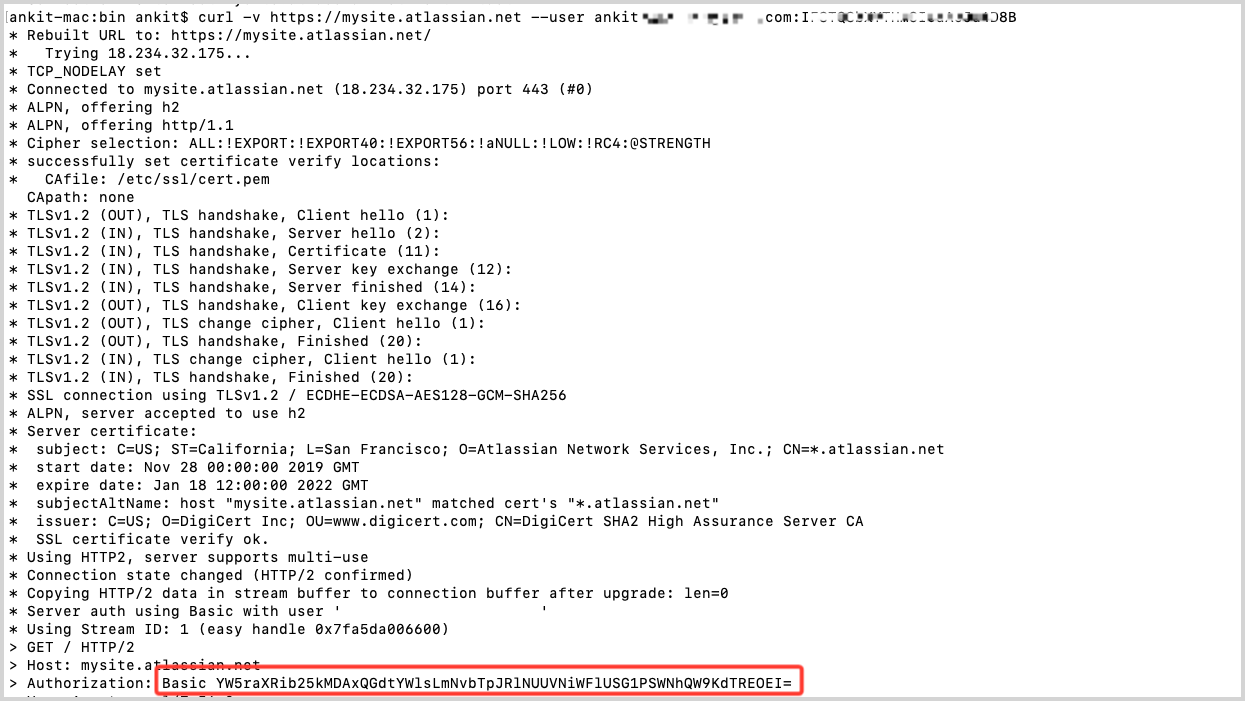
Using the username and password you can generate the Basic Authentication Header. In the following cURL command replace
<me@example.com>with your username and<password>with your password and run it:curl -v https://mysite.atlassian.net --user <me@example.com>:<password>Your response should look like the following image. You'll need the Authorization value when configuring the connection in Sumo Logic.

Configuration in Sumo Logic
In Sumo Logic, Scheduled Searches and Monitors send alerts to other tools via webhook connections. To send alerts from Sumo Logic to Jira Server:
- Create a Webhook Connection.
- Use the Webhook Connection as the Alert Type in a Scheduled Search or the Connection Type in a Monitor.
Create a Webhook Connection
You need the Manage connections role capability to create webhook connections.
Go to Manage Data > Monitoring > Connections.
On the Connections page click the + icon at the top-right of the table.
Select the Jira option. In the Create Jira Connection dialog, fill out connection information.
Enter a Name for the Connection.
(Optional) Enter a Description for the Connection.
Enter a URL from the Jira REST API to create issues. For example, to create an issue:
https://<jira_instance>/rest/api/2/issueSee the [Jira Cloud platform Developer Reference](https://developer.atlassian.com/cloud/jira/platform/rest/v2/#api-group-Issues) for details on acceptable request URLs.Enter your Authorization Header from the prerequisite. It should be in the format:
Basic <random string>(Optional) Custom Headers, enter up to five comma separated key-value pairs.
The following input fields are automatically updated in the JSON Payload and vice versa. Update them to meet your requirements. At a minimum, you'll need to enter a valid Project Key.
- Issue Type
- Project Key
- Issue Summary
- Priority (optional)
- Issue Description
The following JSON is an example of the default Payload, you can customize it as needed. For details on the variables you can use as parameters within your JSON object, see Webhook Payload Variables.
{
"fields": {
    "issuetype": {
    "name": "Bug"
    },
    "project": {
    "key": "Sumo_Logic
    },
    "summary": "{{Name}}",
    "priority": {
    "id": "3"
    },
    "description": "{{QueryUrl}}"
}
}
Details on how to format your payload are available in the Jira Cloud platform Developer Reference.
Click Save.
Create a Scheduled Search
Scheduled searches are saved searches that run automatically at specified intervals. When a scheduled search is configured to send an alert, it can be sent to another tool using a webhook connection.
To set up a scheduled search for a webhook connection follow the steps in the Schedule Searches for Webhook Connections document.

