Set Up SAML for Single Sign-On
Availability
| Account Type | Account Level |
|---|---|
| Cloud Flex | Trial, Enterprise |
| Credits | Trial, Essentials, Enterprise Operations, Enterprise Security, Enterprise Suite |
This page has information about provisioning Security Assertion Markup Language (SAML) 2.0 to enable Single Sign-On (SSO) for user access to Sumo Logic.
In addition to basic SAML configuration, you can choose optional on-demand user creation (using SAML 2.0 assertions), and designate custom login and/or logout portals.
SAML provisioning process
The provisioning process works as follows:
Identify the service provider you will use for SSO. For example:
Configure SAML parameters in Sumo Logic.
Configure service provider settings for Sumo Logic in the SSO system, and verify that any additional Role-Based Access Control (RBAC) roles and groups are set up.
When provisioning is complete, users attempting to access Sumo Logic will be authenticated through the SSO system.
Limitations
This section has key information about SAML in Sumo.
Access keys are not controlled by SAML
This means that if a user has been turned off on the SSO side, their access keys would still be valid. For this reason, administrators should audit users regularly and disable access keys when necessary.
SAML does not provide a deprovisioning mechanism
This means that if a user is deleted or disabled in the SSO database, it will not be reflected in Sumo Logic. However, these users would no longer be able to login to Sumo Logic via SSO. Administrators can delete these users from the Administration > Users and Roles > Users page in Sumo Logic. For information about what happens when a user is deleted, and transferring a deleted user's content to another user, see Delete a User.
Only one certificate for each SAML configuration is currently supported
Only one token-signing ADFS X.509 for each SAML configuration is currently supported. When you need to do a certificate refresh on the ADFS server, you must update the Sumo certificate afterwards.
Prerequisites
Before provisioning SAML, make sure you have the following:
- An installed Identity Provider (IdP) SSO system that supports SAML 2.0. Several SAML IdPs are available. If your organization's IdP supports SAML 2.0 you can configure SAML in Sumo Logic. Examples: Microsoft ADFS, Okta, OneLogin.
- X.509 certificate. This certificate is used to verify the signature in SAML assertions.
- Valid email address. An Email Attribute is required in the assertion: either the SAML Subject or another SAML attribute per the SAML configuration. The value of the Email Attribute must be a valid email address. It is used to uniquely identify the user in the organization.
Configure basic SAML in Sumo
Follow these steps to configure IdP-initiated login. After this procedure, you can enable optional SAML functionality, including SP-initiated login and on-demand provisioning, as described in Optional Configurations.
Go to Administration > Security > SAML.
Select an existing configuration, or click the plus (+) icon to create a new configuration.
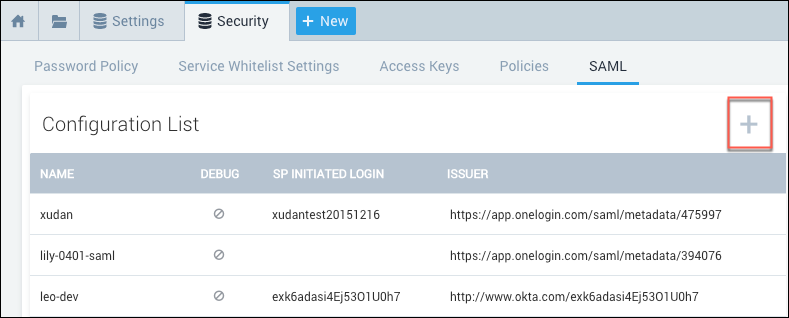
The Add Configuration page appears.
Configuration Name: Enter a name to identify the SSO policy (or another name used internally to describe the policy).
Debug Mode: Select this option if you'd like to view additional details if an error occurs when a user attempts to authenticate. For more information, see View SAML Debug Information.
Issuer: Enter the unique URL assigned to your organization by the SAML IdP.
ADFS example:
http://adfs.myserver.tld/adfs/services/trustX.509 Certificate: Copy and paste your organization's X.509 certificate, which is used to verify signatures in SAML assertions. For ADFS, the certificate required is the Token-signing ADFS X.509 certificate.
Attribute Mapping: Depending on your IdP, select:
- Use SAML subject
- Use SAML attribute and type the email attribute name in the text box.
If you are done configuring SAML, click Add to save your changes, and proceed to Review SAML configuration. To configure optional SAML features, see the following section.
Review SAML configuration
To view the details of your configuration, select it from the Configuration List. The right side of the page displays the configuration details. For any SAML configuration, you'll see an Assertion Consumer URL. If you configure SP-initiated login, you'll also see an Authentication Request URL and Entity ID.
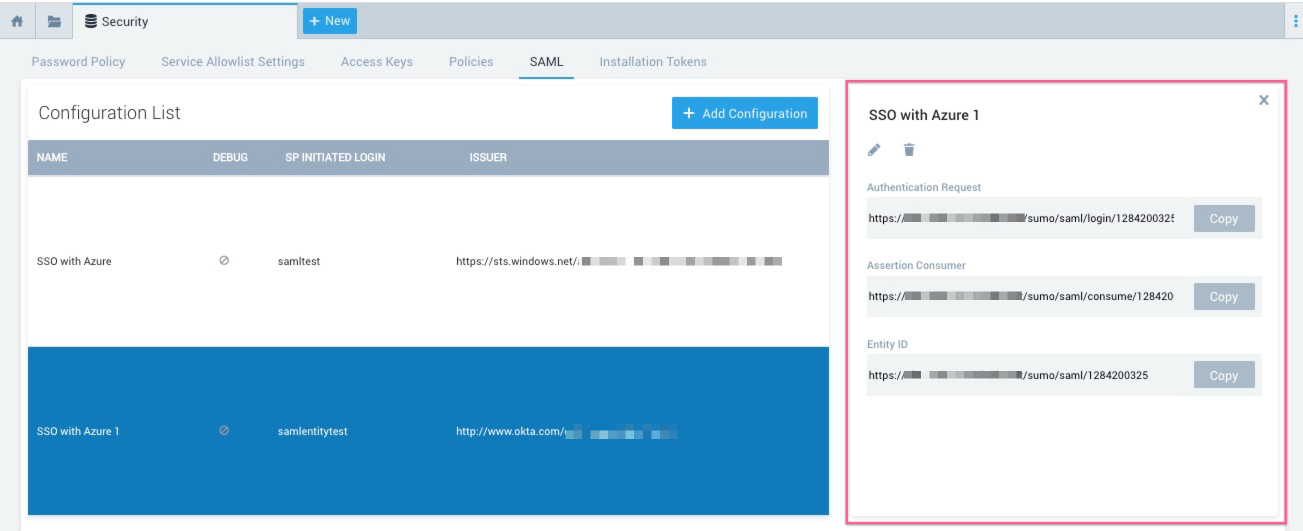
Click the pencil icon to modify the configuration settings. Otherwise, click X to close the dialog box.
Optional configurations
This section has instructions for configuring several optional SAML features.
Configure SP initiated Login
SP initiated login requires a custom Sumo Logic subdomain. If a custom subdomain has not yet been configured for your org, following the instructions in the Change account subdomain section of the Manage Organization topic.
This section has instructions for setting up SP initiated login. When SP initiated login has been enabled, your SAML configuration will appear as an additional authentication option within your subdomain-enabled account login page.
In the steps below, you provide the information necessary for Sumo to issue a SP initiated authentication request to your IdP.
Click SP Initiated Login Configuration in the Optional Settings section of the SAML configuration page. When you click this option, the Authn Request URL field appears.
Authn Request URL. Enter the URL that the IdP has assigned for Sumo Logic to submit SAML authentication requests to the IdP. This field is required if you checked the SP Initiated Login Configuration checkbox.
ADFS example:
https://adfs.myserver.tld/adfs/ls/Disable Requested Authn Context. If you check this option, Sumo will not include the RequestedAuthnContext element of the SAML AuthnRequests it sends to your Idp. This option is useful if your IdP does not support the RequestedAuthnContext element
(Optional) Sign Authn Request. If you select this option, Sumo will send signed Authn requests to your IdP. When you click this option, a Sumo-provided X-509 certificate is displayed. You can configure your IDP with this certificate, to use to verify the signature of the Authn requests sent by Sumo.
If you are done configuring optional SAML features, click Add to save your changes, and proceed to Review SAML configuration. To configure optional SAML features, see the following section.
Configure on-demand roles provisioning
For the Sumo Account Owner user to be able to authenticate using SAML with on-demand roles provisioning enabled, that user must belong to a group named "Administrator" on the IdP. When the account owner tries to log on to Sumo Logic, the SAML assertion issued by the IdP must include the "Administrator" group or SAML authentication will fail for the Account Owner user.
If you enable the Roles Attribute option, Sumo Logic assigns roles to a user every time the user logs in. Roles are configured by your IdP and assigned as part of the SAML assertion. For this feature, you must have:
- Configured a group on your IdP for each Sumo role that you want to provision, with the same name as the Sumo role. For example, you should have an “Administrator” group in your IdP, just as you have an “Administrator” role in Sumo.
- Assigned your Sumo users to the appropriate groups in your IdP, based on the Sumo roles you want to assign to each user.
Click the Roles Attribute checkbox. The Roles Attribute field appears.
Roles Attribute. Enter the SAML Attribute Name that is sent by the IdP as part of the assertion. For example, "Sumo_Role".
noteThere are two parts to configuring on-demand roles provisioning: you configure the Roles Attribute on the Sumo side, and you configure that same value using a option when configuring the IdP to integrate with Sumo. The option or parameter you set depends on the IdP.
If you are done configuring optional SAML features, click Add to save your changes, and proceed to Review SAML configuration. To configure optional SAML features, see the following section.
Configure on-demand user account provisioning
If you configure on-demand provisioning, Sumo Logic automatically creates a user account the first time a user logs on to Sumo. To complete this procedure, you need to supply the First Name and Last Name attributes your IdP uses to identify users.
When the account is created, Sumo Logic credentials are emailed to the user. Users need both Sumo Logic credentials and SAML permissions.
Click the On Demand Provisioning checkbox.
First Name Attribute. You might need to provide the full attribute path, which can vary based on the ADFS version (the actual path can be seen in the SAML assertion). The following are examples:
http://schemas.microsoft.com/ws/2008/06/identity/claims/givennameLast Name Attribute. You might need to provide the full attribute path, which can vary based on the ADFS version (the actual path can be seen in the SAML assertion). The following are examples:
http://schemas.microsoft.com/ws/2008/06/identity/claims/surnameOn Demand Provisioning Roles. Specify the Sumo RBAC roles you want to assign when user accounts are provisioned. (The roles must already exist.)
If you are done configuring optional SAML features, click Add to save your changes, and proceed to Review SAML configuration.
Configure logout page
Configure a logout page if you would like to point Sumo users to a particular URL after logging out of Sumo Logic or after their session has timed out. You could choose your company's intranet, for example, or any other site that you'd prefer users in your organization access.
- Click the Logout Page checkbox.
- Enter the URL of the page to which you want to direct users after logging of Sumo.
- Click Add to save your configuration, and proceed to Review SAML configuration.
Create multiple SAML configurations
You can create multiple SAML configurations in Sumo. To create an additional SAML configuration, click the plus (+) icon to create a new configuration. Enter the settings for the new configuration, as described the previous section.

Require SAML for sign-in
After you create a SAML configuration, you can require users to sign in using SAML and prevent users from bypassing SAML with a username and password for login. Before you do so, follow the instructions in Check SAML Usage.
Check SAML Usage
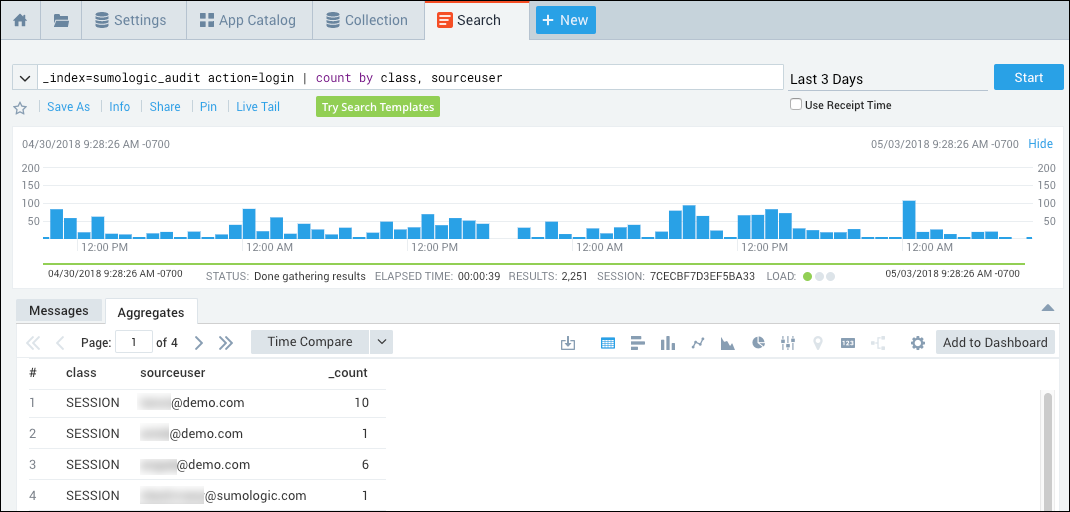
If you intend to require Sumo users to sign-in using SAML, as described in the following section, Require SAML for sign-in, it is a best practice to first check whether some users are still logging in directly, instead of using SAML. You can run the following query to see, for a particular time range, whether users signed in using SAML or with their username and password:
_index=sumologic_audit action=login | count by class, sourceuser
This query depends upon data in the Sumo audit index. If the audit index is not enabled, the query will not return results. To enable the index, follow the instructions in Enable and Manage the Audit Index.
The query results show, for each user that has accessed Sumo over the time range, the number of times they have logged in using SAML or by entering a Sumo username and password. In the class column:
- "SAML" indicates the user signed in using SAML.
- "SESSION" indicates the user authenticated by entering a username and password.
If the same user accessed Sumo using both methods (SAML and direct logon) during the time range, the query results will include a row for each method, showing how many times each method was used.
Require SAML for sign-in
Click Require SAML Sign In to require users to sign in using SAML.
After you lock down SAML, any new users you allowlist will have to select Forgot Password from the login screen to recover their credentials. This is because a SAML-locked down user does NOT have a password.
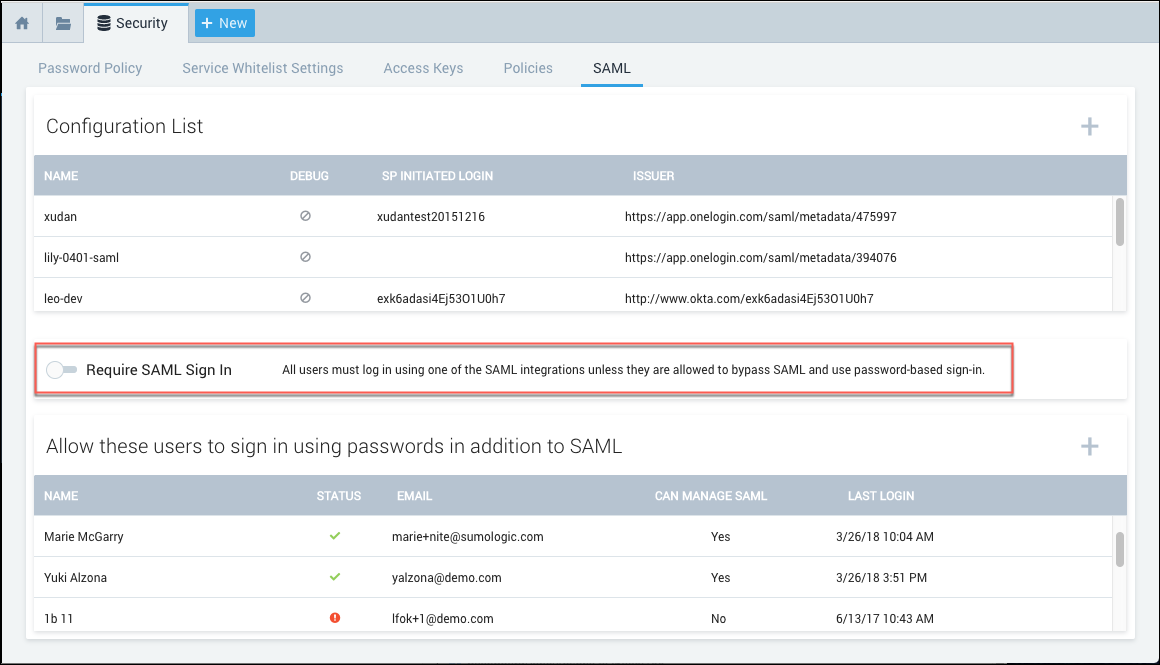
Sumo automatically adds your account under Allow these users to sign in using passwords in addition to SAML as an allowlisted user as a preventative measure to ensure you’re still able to access Sumo if you run into issues.
Having only one user able to bypass SAML may not be convenient or practical if you have a global company or a large team. You can add additional allowlisted users by clicking the (+) icon by Allow these users to sign in using passwords in addition to SAML:

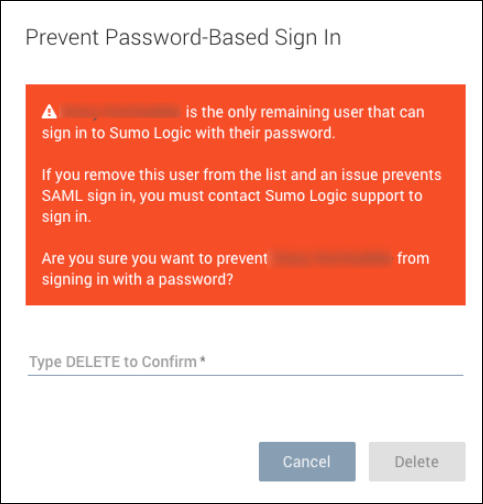
We do not recommend denying all users password access to Sumo even if you want to enforce log in by SAML. If you attempt to delete your last remaining allowlisted user, you will receive a warning that this is not a recommended practice:
SAML lockdown limitations
There are user account changes an admin cannot perform when the Require SAML Sign In option is selected:
- You cannot change a user's login email address when SAML is locked down.
- You cannot reset a user's password when SAML is locked down.
- If a user's account has been locked as a result of too many failed login attempts, you cannot unlock the account while SAML is locked down.
To make these changes, you must toggle off the Require SAML Sign In option, make the updates, and then turn Require SAML Sign In back on.

