Create and Manage Roles
This page has instructions for creating and managing Sumo Logic roles. The roles you assign to a user control what Sumo Logic capabilities are available to the user and what log data the user can access. This functionality is referred to as role-based access control.
Built-in Administrator and Analyst roles
There are two built-in roles in a Sumo Logic account: Administrator and Analyst.
The Administrator role is a super user. It has all of the capabilities that can be assigned to a role, and its [role search filter]v enables access to all data in Sumo Logic. You cannot edit or delete the Administrator role.
Users with the Analyst role have a single capability: View Collectors. Its role search filter enables access to all data in Sumo Logic. You can edit the Analyst role filter to change the capabilities assigned to it and to make the role filter more restrictive. You can also delete the Analyst role if desired. For more information see Edit a role and Delete a role below.
Create a role
To create a role:
Go to Administration > Users and Roles > Roles.
Click + Add Role on the upper right side of the page.
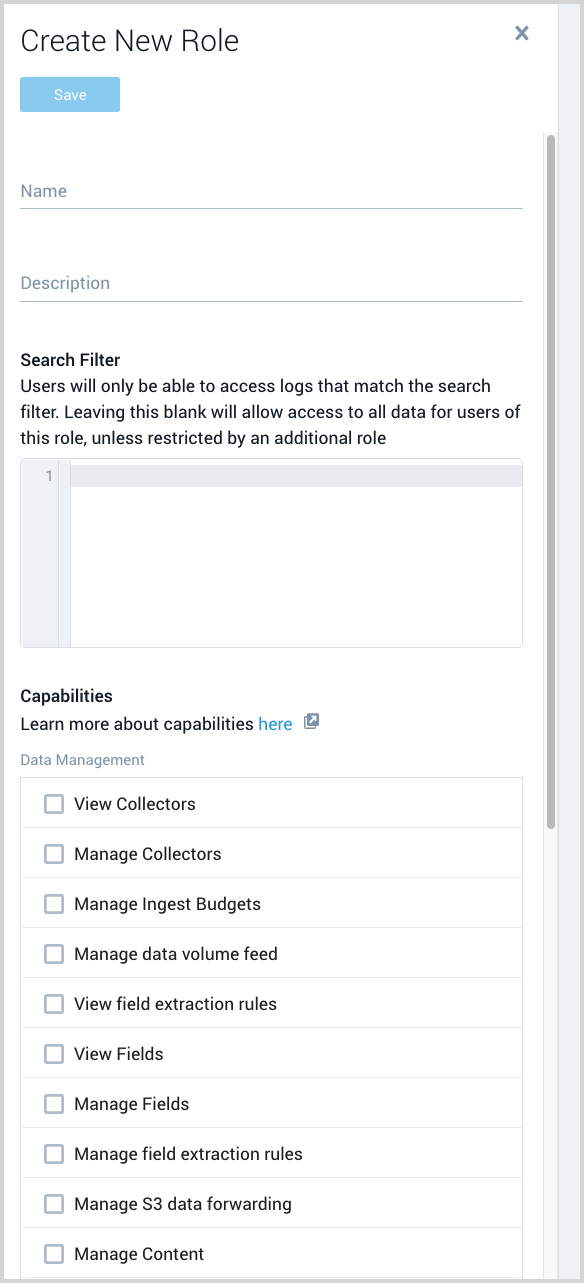
The Create New Role pane appears on the right side of the page.

Name. Enter a name for the role.
Description. Enter a description of the role to help other Administrators understand the purpose or limitations of the role.
Search Filter. Use this option to control what log data users with this role can access. A search filter for a role defines what log data a user with that role can access. You can define a search filter using keywords, wildcards, metadata fields, and logical operators. Sumo prepends the search filter to each query that a user with the role runs. The search filter is invisible to the user, but limits the log results that are returned. See Construct a Search Filter for a Role for details and examples on constructing search filters for roles. The simple role filter below prevents users from viewing logs from Sources that include "billing" in their name.
!_source="billing"Capabilities. In this section, click the checkbox beside each capability you want to grant to users with this role. For information about what each capability enables, see Role Capabilities.
Click Save.
Add a user to a role
Go to Administration > Users and Roles > Roles.
Navigate to the role and click the number in the Users column.

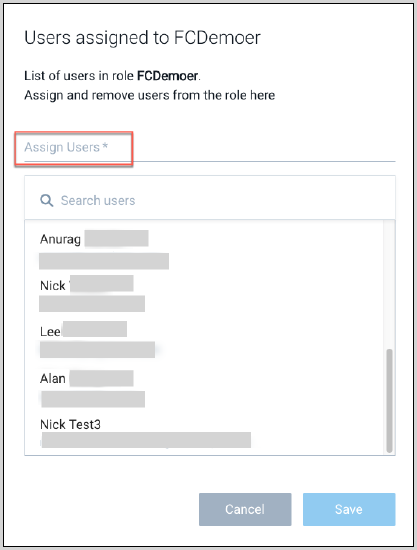
A list of users currently assigned to the role appears.

Click the Assign Users field. A list of users that are not currently assigned to the role appears. Click a user’s name to add the user to the role.
Add additional users to the role, as desired.
Click Save when you are done adding users to the role.
important
When you add or remove a role from a user, it can take about an hour for the RBAC changes to take effect on an existing real-time alert. For example, when a user creates a real-time alert, the user’s search filter governs what log data is returned by the scheduled search. If an admin subsequently makes that user’s search filter more restrictive or removes that role from the user, for about an hour, alerts triggered by data that the user’s updated search filter now prohibits will still fire. (Changes take effect immediately for manually run searches.)
Remove a user from a role
Go to Administration > Users and Roles > Roles.
Navigate to the role and click the number in the Users column.

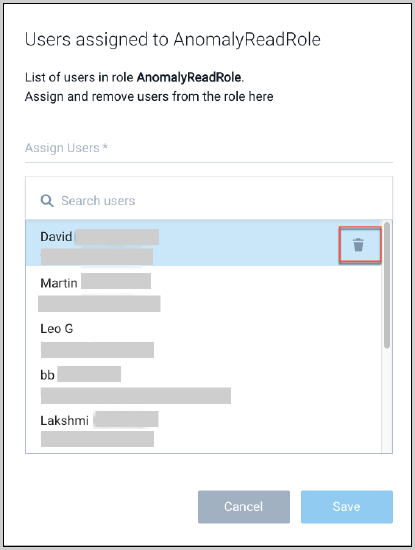
A list of users currently assigned to the role appears.
Navigate to the user you want to remove from the role, and click the trash can icon in that row.

Click Save when you are done removing users from the role.
important
When you add or remove a role from a user, it can take about an hour for the RBAC changes to take effect on an existing real-time alert. For example, when a user creates a real-time alert, the user’s search filter governs what log data is returned by the scheduled search. If an admin subsequently makes that user’s search filter more restrictive or removes that role from the user, for about an hour, alerts triggered by data that the user’s updated search filter now prohibits will still fire. (Changes take effect immediately for manually run searches.)
See which users are assigned to a role
Go to Administration > Users and Roles > Roles.

Navigate to the role and click the number in the Users column to see a list of users assigned to the role.
Edit a role
To edit a role:
- Go to Administration > Users and Roles > Roles.
- Click the row for the role you want to edit.
- The current configuration of the role appears in a pane on the right side of the page.
- Click Edit at the top of the right side of the page.
- Make your edits. For information about edit options, see Create a role above.
- After editing the role, click Save.
Delete a role
You can only delete a role to which no users are assigned. Before deleting a role, you must unassign any users currently assigned to it. For information about unassigning a user from a role, see Add or Remove Users from a Role.
To delete a role:
- Go to Administration > Users and Roles > Roles.
- Click the row for the role you want to delete.
- The current configuration of the role appears in a pane on the right side of the page.
- Click Delete at the top of the right side of the page.
- If there are users currently assigned to the role, an error message will appear. Otherwise, you’ll be prompted to confirm that you want to delete the role.